I Want My Bot to Tweet Out Any Time I Upload a Picture on Twitter
TL;DR: This blog post is aimed to demonstrate how to make a custom Twitter bot in Python using the official Twitter API. The bot will answer to every tweet in which it got mentioned with a specific keyword. The answer will be in the course of an image with a quote written on it.
Source code of this application is available in this GitHub repository
Introduction
In this commodity, you'll larn how to brand your own Twitter bot in Python using Tweepy, a Python library for accessing the official Twitter API.
You will be creating a Reply to mentions bot, which will ship a reply to everyone'southward tweet who has mentioned it with a specific keyword.
The reply will be in the form of an image that y'all volition generate and put some text over it. This text will exist a quote that you volition fetch from a tertiary-party API.
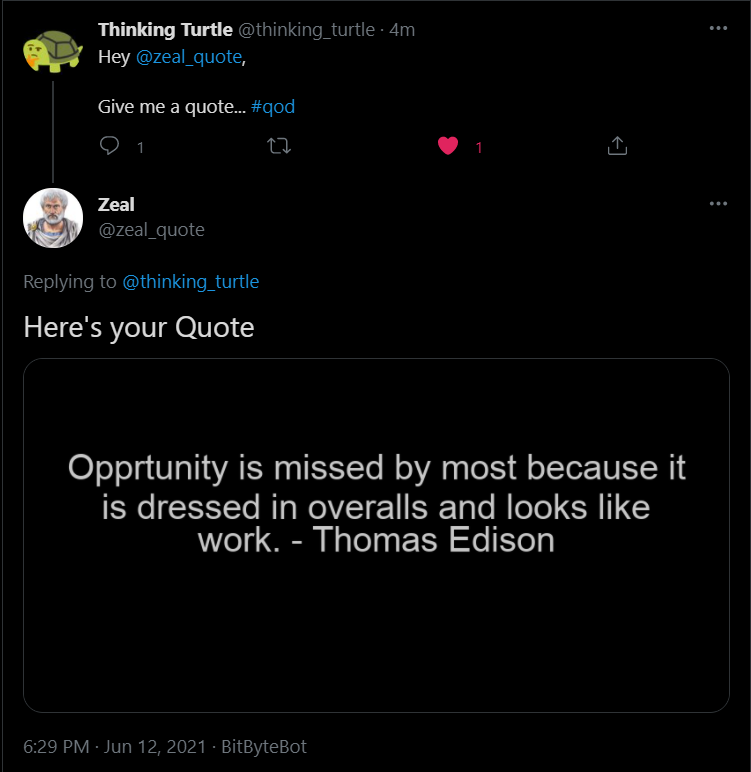
Here's how information technology will look like:
Prerequisites
To follow along with this tutorial, brand sure y'all accept:
An AWS account
Yous are going to deploy the final application to AWS Elastic Beanstalk then brand certain you lot are signed up on AWS.
Twitter API hallmark credentials
To enable your bot to interact with Twitter, yous first have to sign upwardly to a Twitter programmer account and create an application for which Twitter will grant you admission (There is a detailed caption of this step in the next section).
Python iii
At the fourth dimension of writing this article, the latest version is Python iii.nine, but information technology is always recommended to choose a version that is one point revision backside the latest ane and then that you do not face whatever compatibility issues with third-party modules. For this tutorial, you can get with Python iii.8.
Installed these external Python libraries on your local environment
- Tweepy — To interact with Twitter API
- Pillow — To create an paradigm and to add together texts over it
- Requests — To make HTTP requests to the random quote generator API
- APScheduler — To schedule your job periodically
- Flask — To create a web app for deploying your application on Elastic Beanstalk
Balance all other libraries that y'all'll come across in this project are part of Python's standard library, so yous do not demand to install them.
Twitter API Authentication Credentials
Any asking that is accessing the official Twitter API requires OAuth for authenticating. That'due south why you demand to create those required credentials to be able to use the API. These credentials include:
- A consumer primal
- A consumer secret
- An access token
- An admission secret
You demand to follow the steps beneath to create your credentials once you have signed upward to Twitter:
Pace 1: Apply for a Twitter Programmer Account
Go to the Twitter developer platform to apply for a developer business relationship.
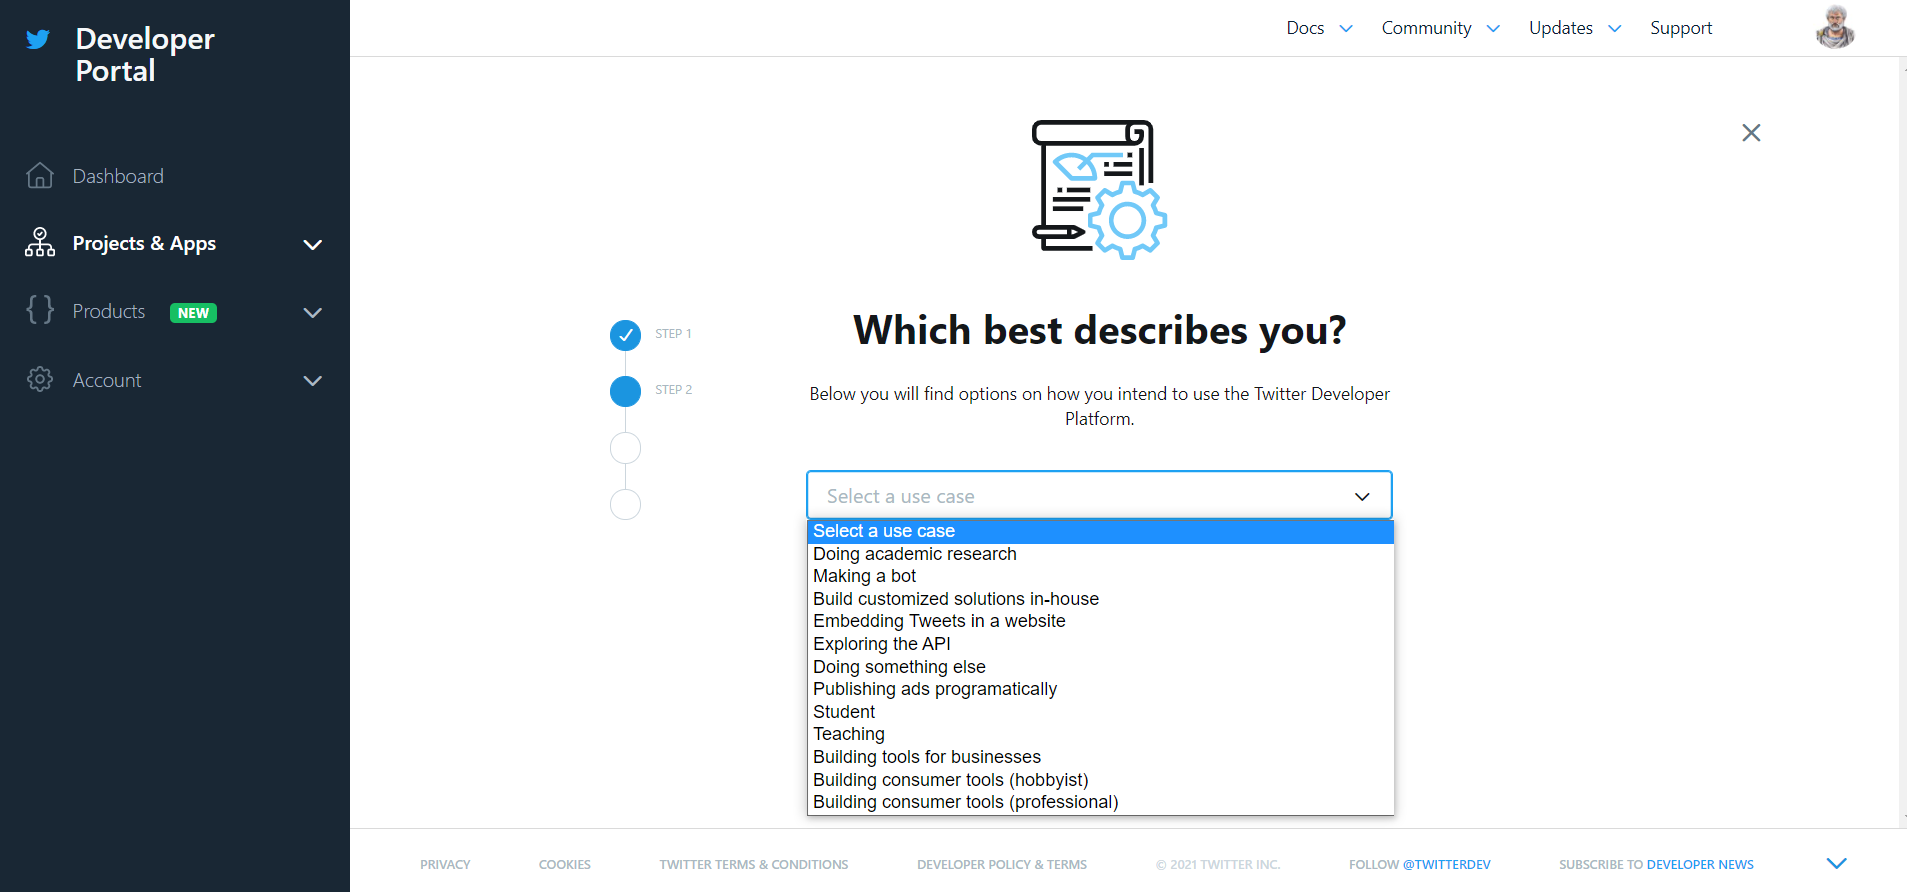
Twitter will enquire for some information about how you're planning to use the developer account. So, you have to specify the use example for your application.
Try to be as specific as possible almost your intended employ for faster and better chances of getting approval.
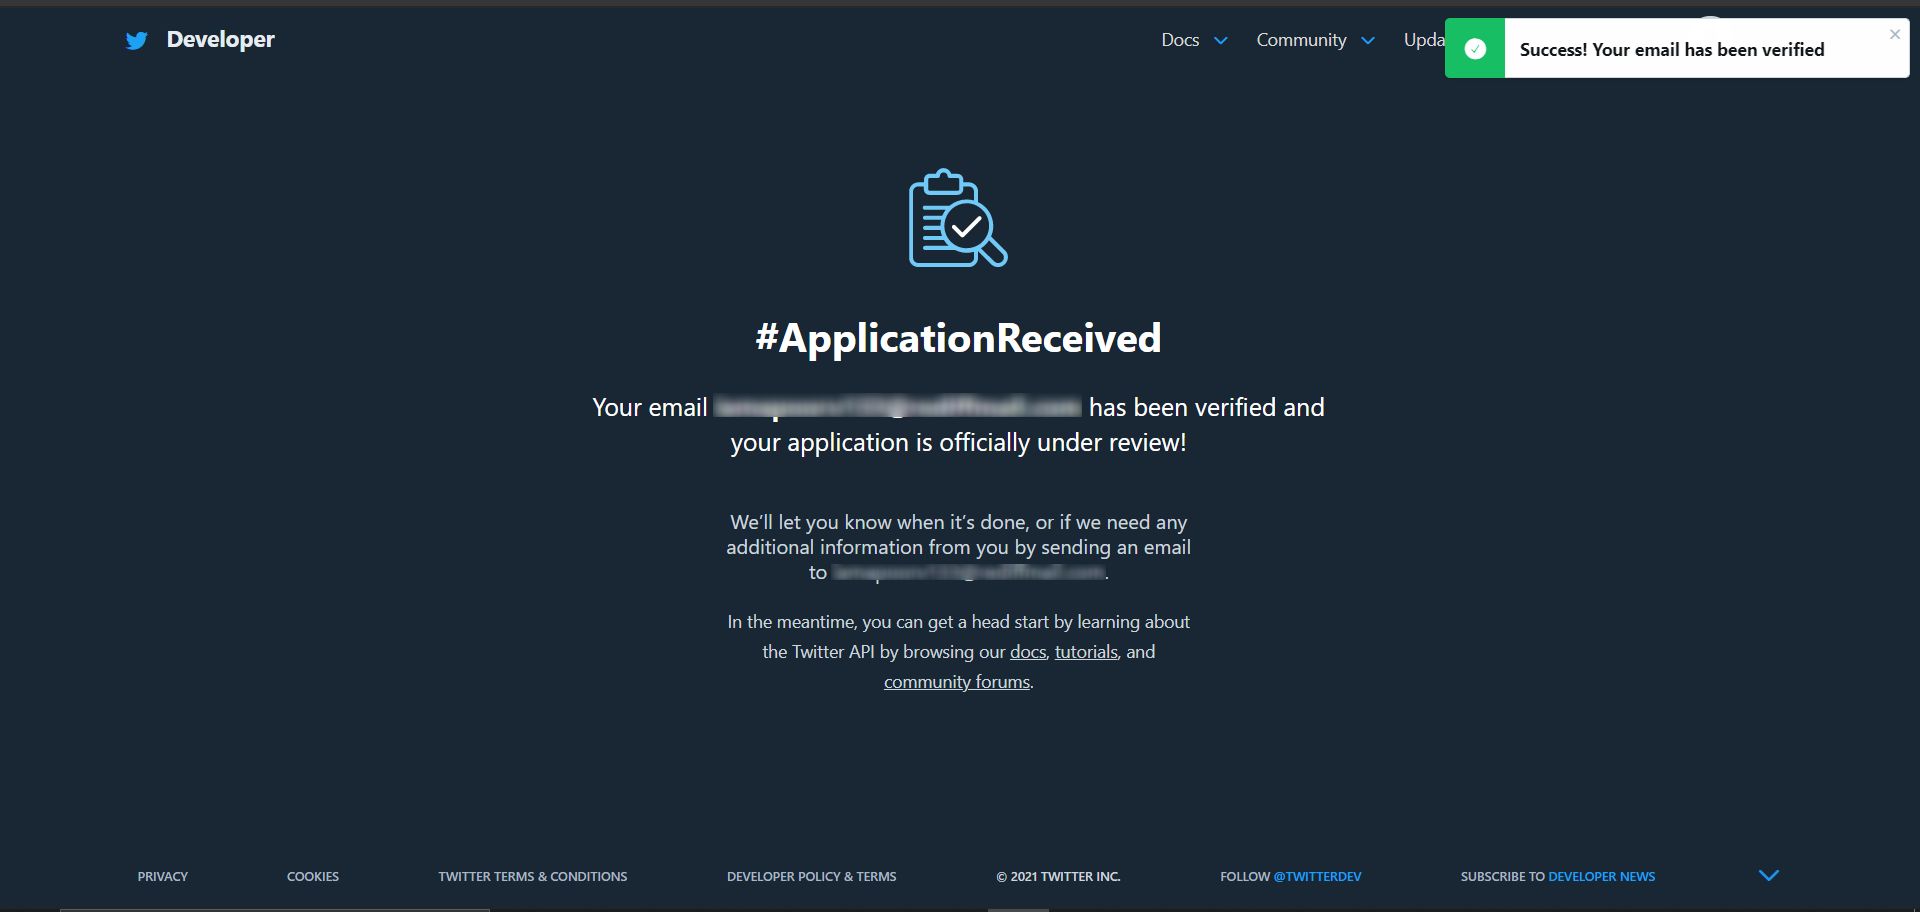
Once you lot submit your application, you'll land on this screen :
Footstep ii: Create an Application
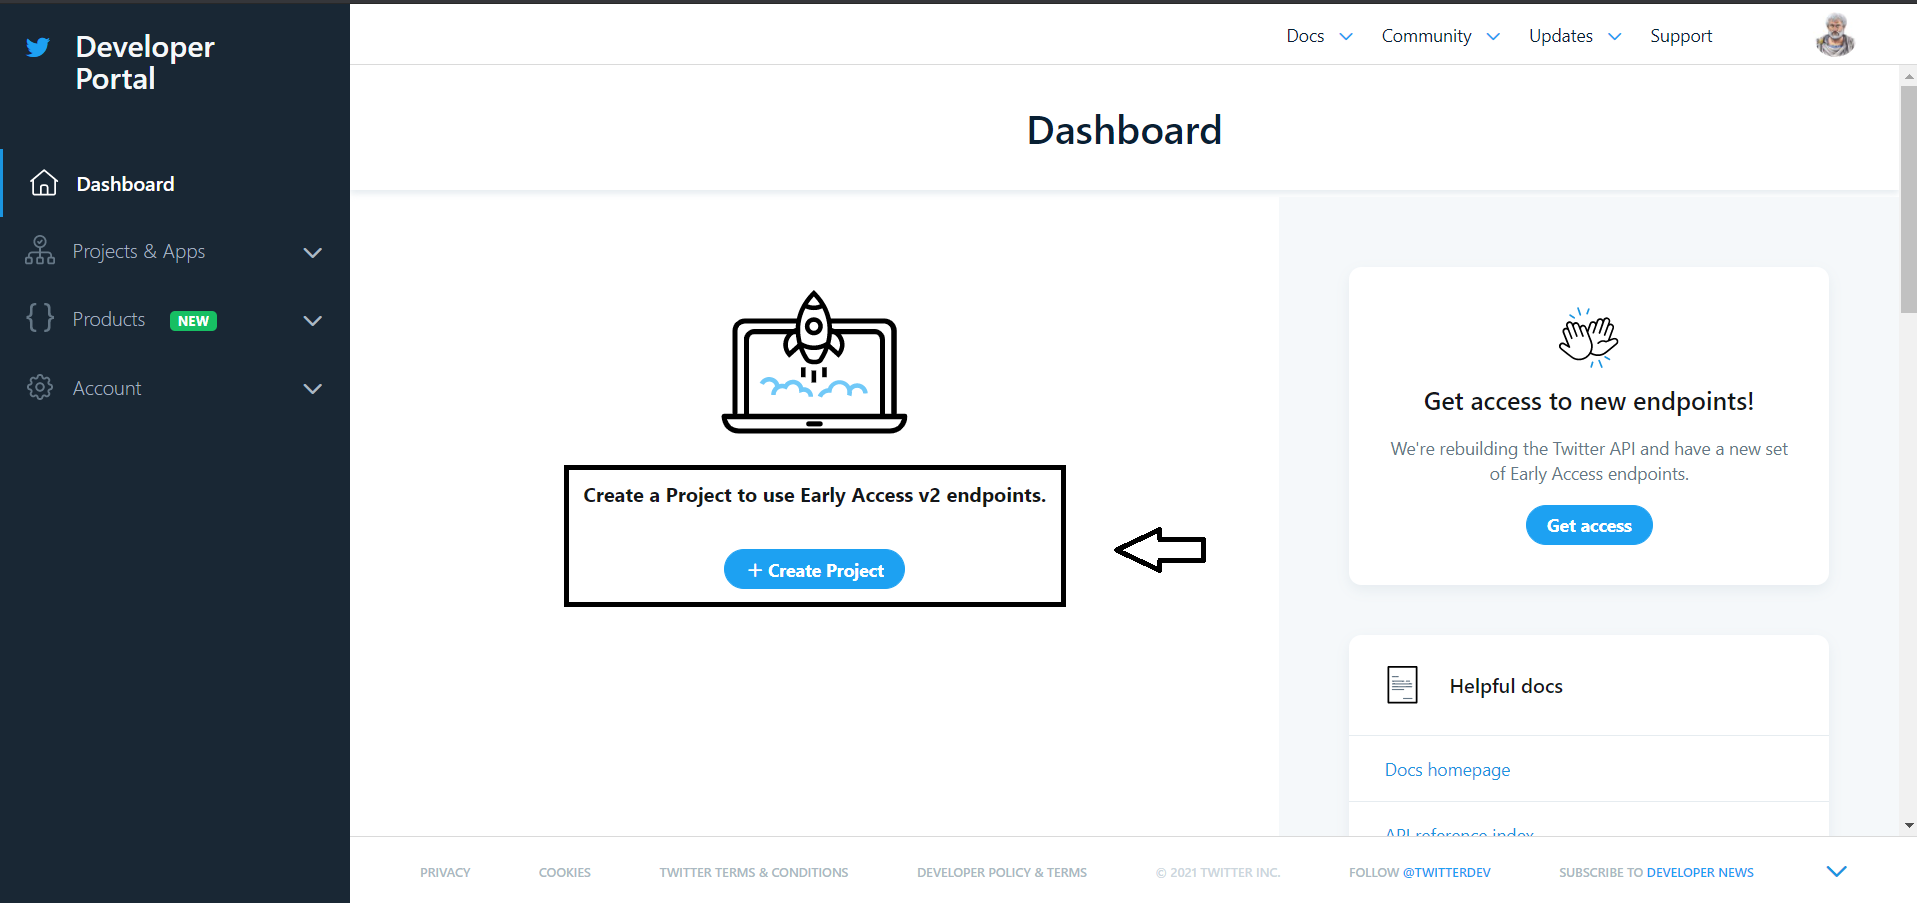
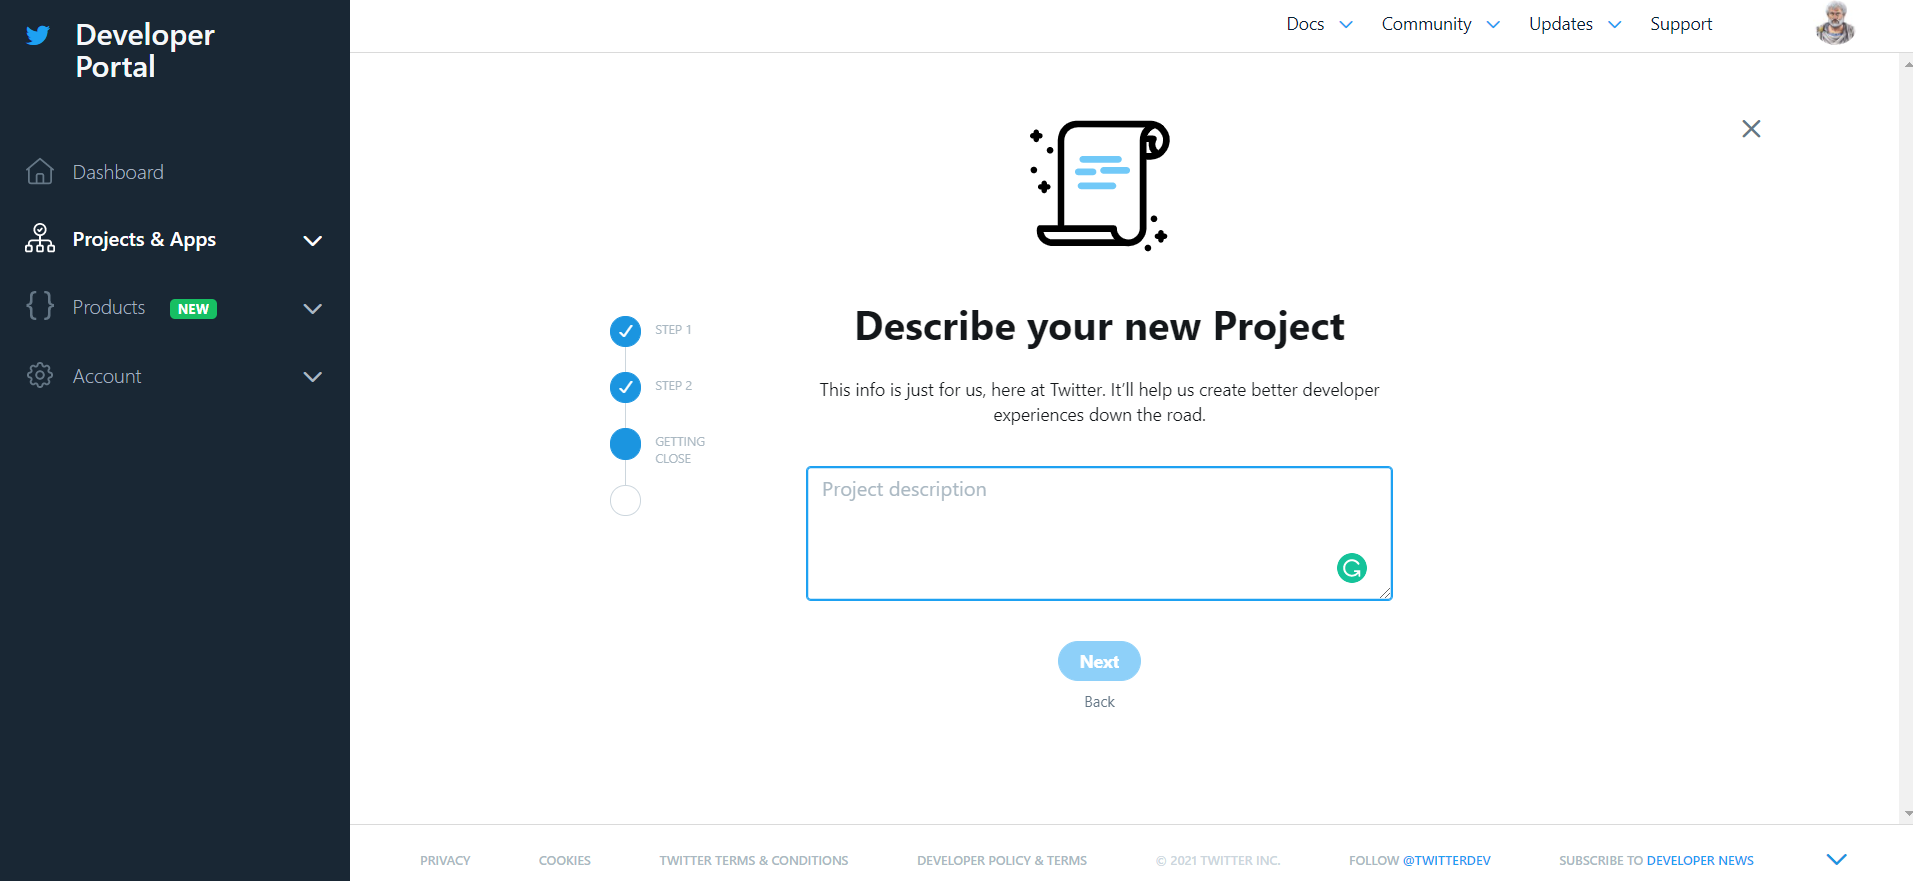
You lot'll receive the confirmation back within a week. Once your Twitter developer business relationship access gets approved, create a projection on the Twitter programmer portal dashboard.
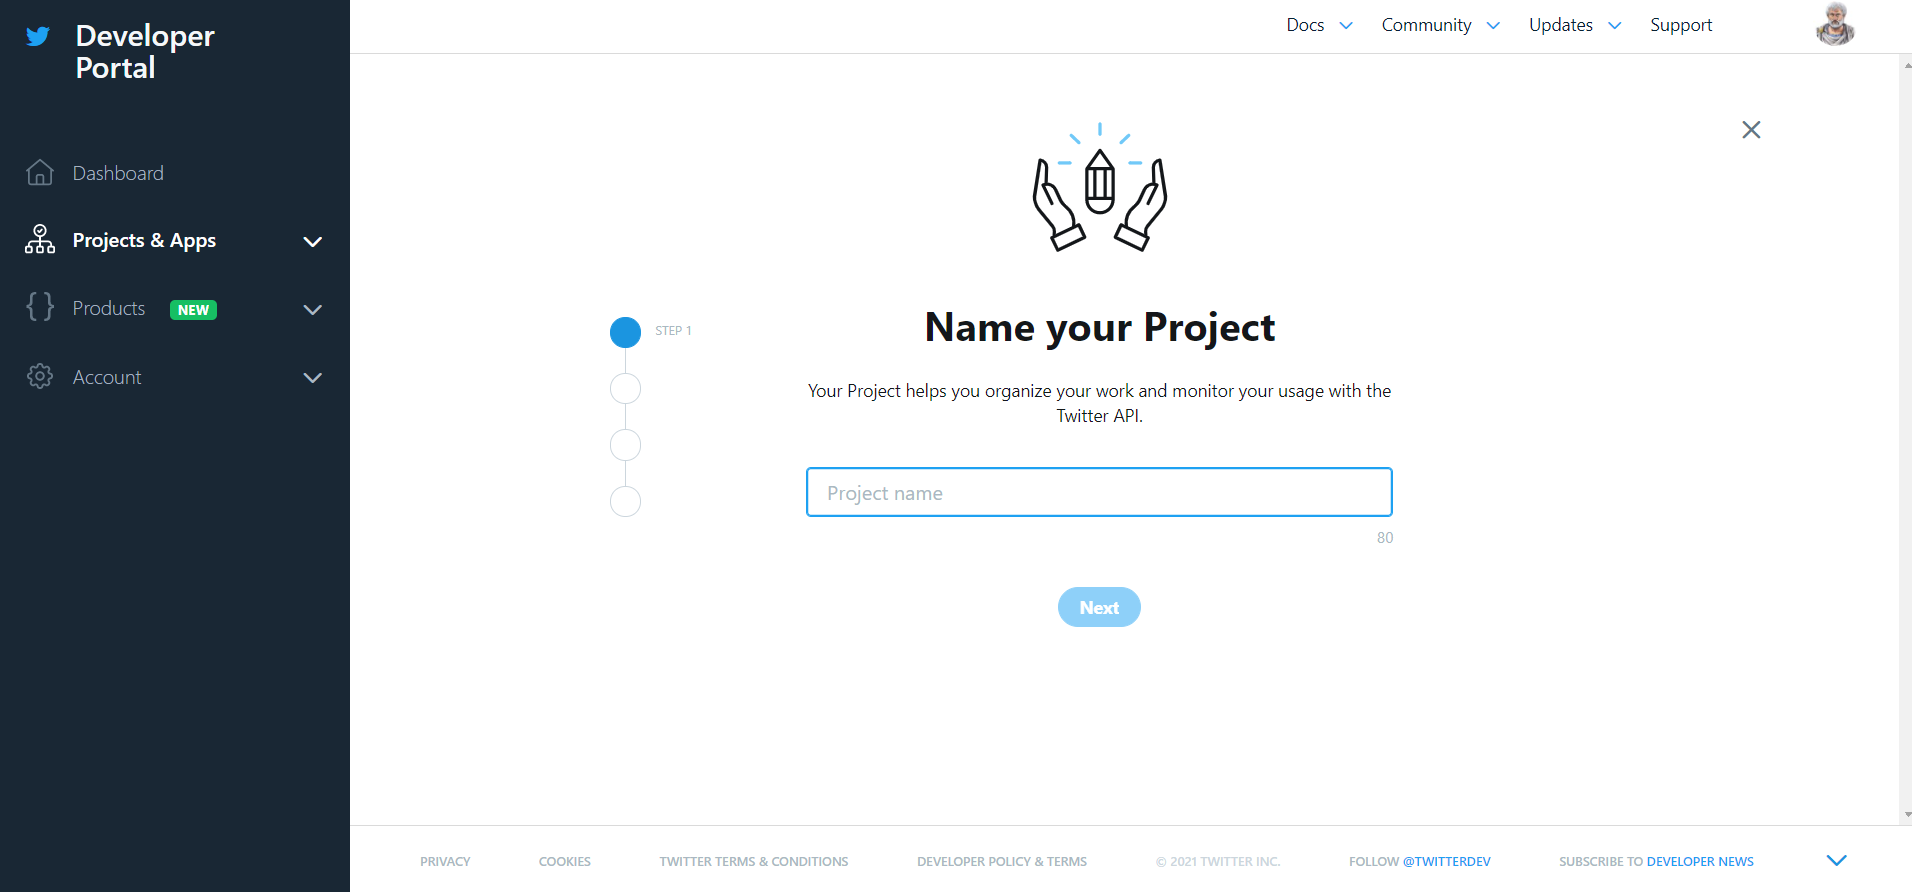
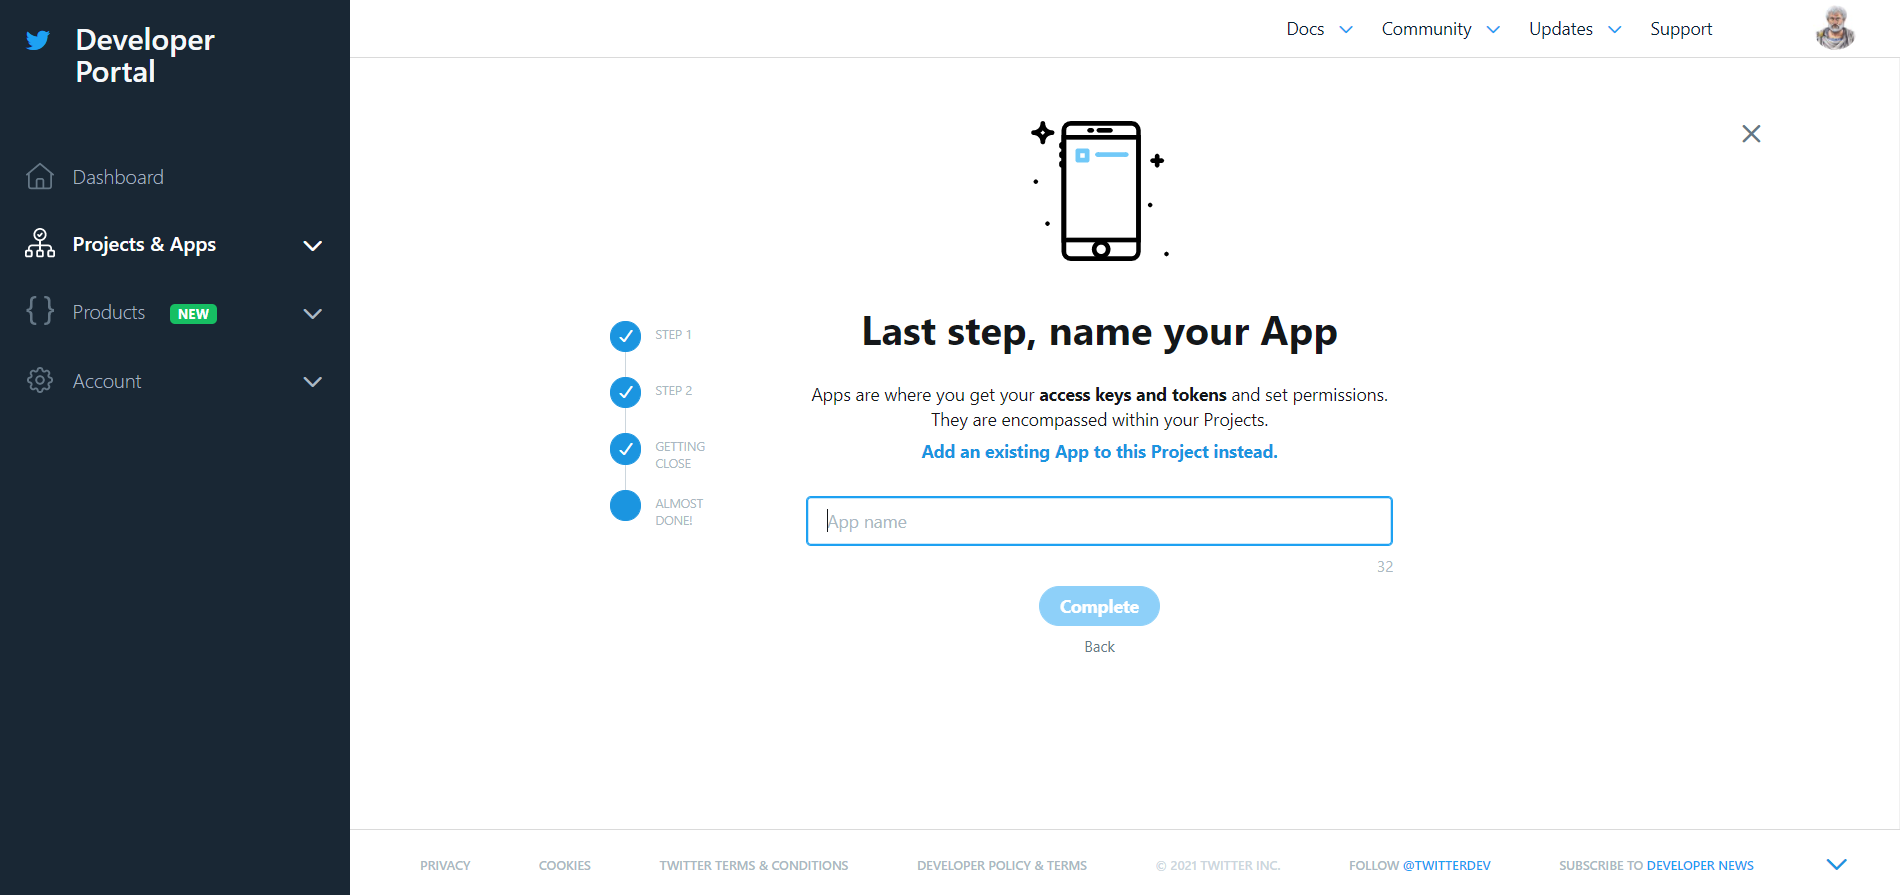
You have to do this process because Twitter permits authentication credentials only for apps. An app can be defined as any tool that uses the Twitter API. You demand to provide the following data well-nigh your project:
- Project name: a name to identify your projection (such as Answer-To-Mention-Bot)
- Category: Select the category to which your project belongs. In this case, choose "Making a bot."
- Description: The purpose of your project or how users volition employ your app (such equally this app is used to automatically respond to tweets)
- Proper name of app: Finally, enter the name of your app
Step 3: Create the Authentication Credentials
To create your authentication credentials, firstly, get to your Twitter apps section. Hither you'll find the "Keys and Tokens" tab; clicking this will take you to another page where you can generate the credentials.
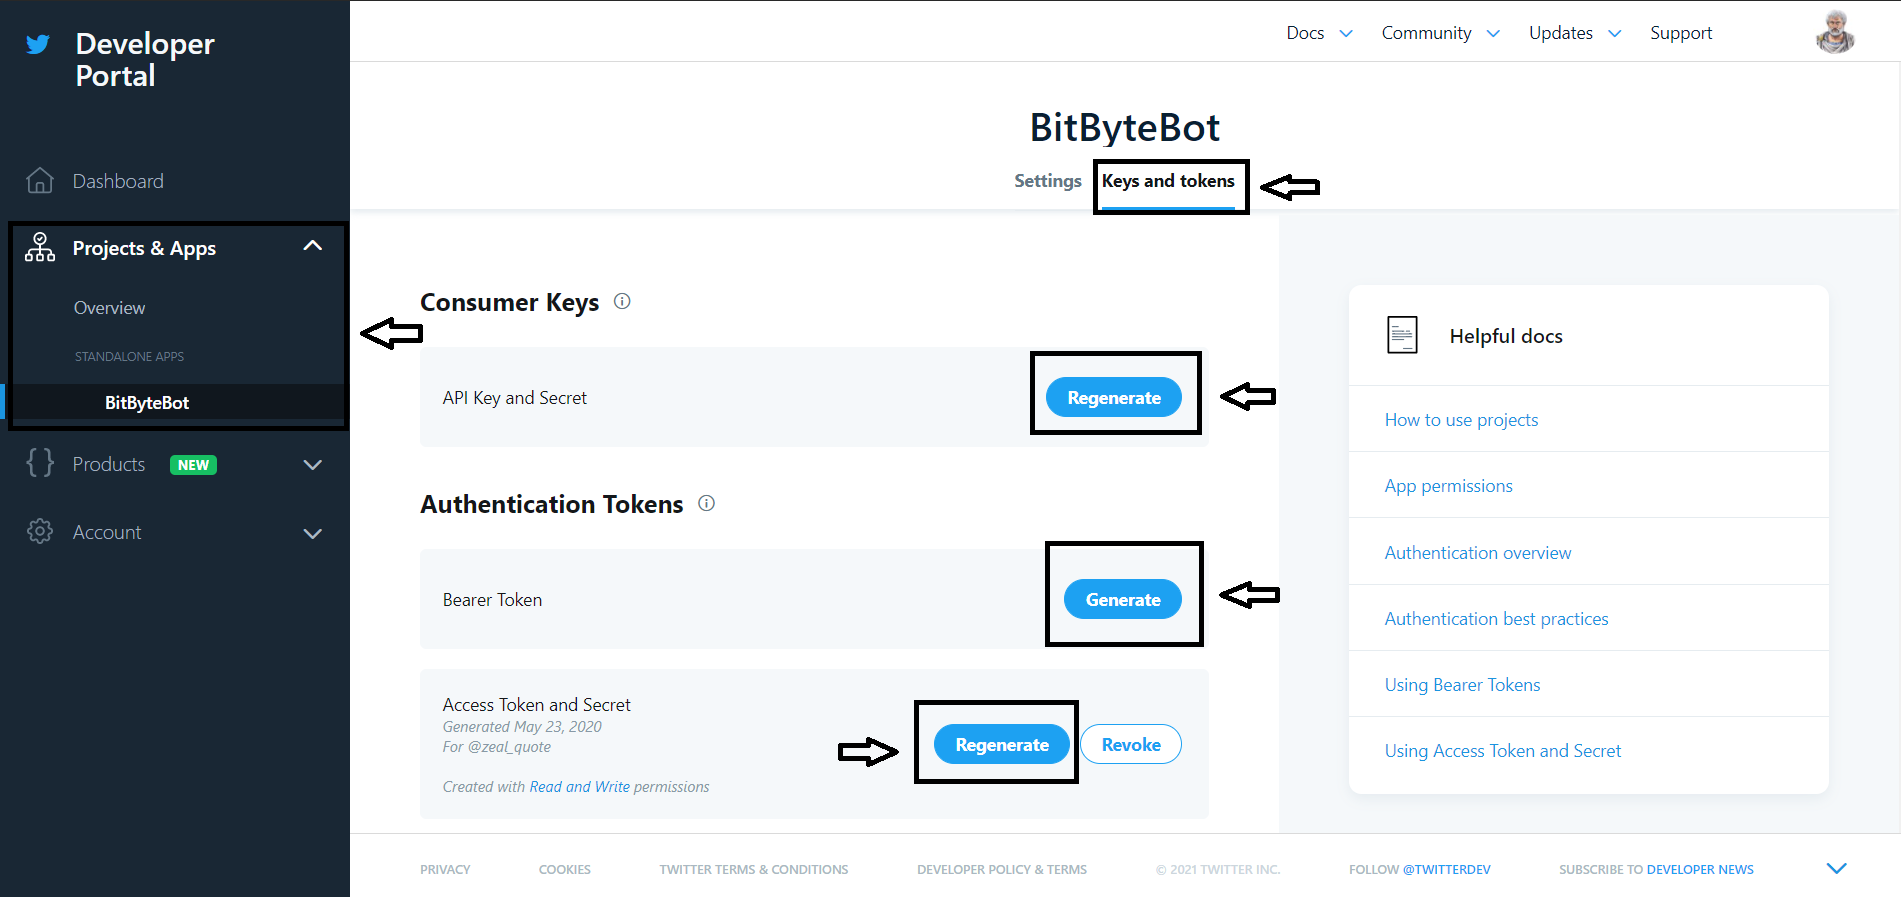
After generating the credentials, relieve them to your local machine to afterward use in your code. Within your project folder, create a new file called credentials.py and store these four keys in the key-value format equally shown below:
access_token= "XXXXXXX" access_token_secret= "XXXXXXXX" API_key= "XXXXXXX" API_secret_key= "XXXXXXXX" You tin even test the credentials to check if everything is working as expected using the following code snippet:
import tweepy # Authenticate to Twitter auth = tweepy.OAuthHandler( "CONSUMER_KEY" , "CONSUMER_SECRET" ) auth.set_access_token( "ACCESS_TOKEN" , "ACCESS_SECRET" ) api = tweepy.API(auth) try : api.verify_credentials( ) impress ( "Authentication Successful" ) except : print ( "Authentication Mistake" ) If everything is correct, y'all should be able to see a response saying "Authentication Successful".
Agreement Tweepy
Tweepy is an open-sourced, piece of cake-to-utilise Python library for accessing the Twitter API. It gives you an interface to admission the API from your Python application.
To install the latest version of Tweepy, type the post-obit command in your console:
pip install tweepy Alternatively, you can also install information technology from the GitHub repository.
pip install git+https://github.com/tweepy/tweepy.git Let'due south at present understand some of its basic functionalities:
OAuth
Tweepy provides an OAuthHandler class that takes intendance of the OAuth required past Twitter to authenticate API calls. The code y'all just saw in a higher place depicts the OAuth functionality past Tweepy.
Twitter API wrapper
Tweepy likewise provides an API form for accessing the Twitter RESTful API methods, which you can employ to access various Twitter functionalities. You can notice those methods here and the almost unremarkably used are listed below:
- Methods for tweets
- Methods for users
- Methods for user timelines
- Methods for trends
- Methods for likes
Models
When you lot call any of the API methods that yous just saw above, you lot'll become a Tweepy model class example in response. This volition comprise the response returned from Twitter. For example:
user = api.get_user( 'apoorv__tyagi' ) This returns a User model which contains the data which you can further use in your application. For example: python print (user.screen_name) #User Name print (user.followers_count) #User Follower Count
Fetching the Quote
Now you will begin with the beginning step towards building your Bot. As stated in a higher place, when someone mentions your bot, it volition reply to them with an paradigm having a quote written on it.
So to fetch the quote in the kickoff place, you will be calling a Random quote generator API To do that, create a Python file tweet_reply.py and make a new method inside it that will brand an HTTP asking to this API endpoint and get a quote in response. For this, you can use Python's requests library.
The requests library is used to make HTTP requests in Python. It abstracts the complexities of making requests behind a unproblematic API so that you lot can only focus on interacting with services and consuming data in your application.
def get_quote ( ) : URL = "https://api.quotable.io/random" try : response = requests.become(URL) except : print ( "Error while calling API..." ) The response looks like this:
{ "_id" : "FGX8aUpiiS5z" , "tags" : [ "famous-quotes" ] , "content" : "I do not believe in a fate that falls on men nevertheless they human action, but I do believe in a fate that falls on them unless they human activity." , "author" : "Buddha" , "authorSlug" : "buddha" , "length" : 125 } The API returns a JSON response, so to parse it, you lot tin utilize the JSON library. Json is a function of Python's standard library, so y'all can straight import it using: import json.
From the response, you volition just demand the content and the writer, and so you will make your part return only those values. Here's how the complete part will await similar:
def get_quote ( ) : URL = "https://api.quotable.io/random" endeavour : response = requests.get(URL) except : print ( "Mistake while calling API..." ) res = json.loads(response.text) return res[ 'content' ] + "-" + res[ 'author' ] Generating Image
You've got your text. Now you need to create an image and put this text over information technology.
Whenever you need to deal with whatever image-related tasks in python, always outset look for the Pillow library. Pillow is Python's imaging library which gives powerful epitome processing capabilities to the Python interpreter along with providing extensive file format back up.
Create a seperate file, proper name it Wallpaper.py and add one office that will accept the quote as a string in its parameter and volition initialize all the required variables to generate an image:
def get_image (quote) : image = Prototype.new( 'RGB' , ( 800 , 500 ) , color= ( 0 , 0 , 0 ) ) font = ImageFont.truetype( "Arial.ttf" , 40 ) text_color = ( 200 , 200 , 200 ) text_start_height = 100 write_text_on_image(image, quote, font, text_color, text_start_height) image.salvage( 'created_image.png' ) Allow'due south sympathize how this function works:
-
Image. new ( )method creates a new image using the provided mode & size. The get-go parameter is the style to be used for creating the new image. (It could exist RGB, RGBA). The 2d parameter is size. Size is provided in pixels equally a tuple of width & height. The concluding parameter is the colour, i.e., what color to use for the epitome background (Default is black). -
ImageFont. truetype ( )creates a font object. This function loads a font object from the given font file with the specified font size. In this instance, you will be using "Arial", you tin can also use any other font of your choice by downloading it from hither. Make sure the font file has .ttf (TrueType font) file extension, and y'all save it inside the root directory of your project. -
text_color&text_start_heightas the name itself depicts, these are the color and the start height of the text, respectively. RGB(200,200,200) is a "Low-cal Gray" color that can piece of work well over your black color image. - You call the
write_text_on_image ( )function, which will put this text over the image using these variables. -
image. salvage ( )will finally salvage the paradigm every bitcreated_image.pngfile in your root folder. If there is an already existing file with this name, it will automatically replace it with the new one.
def write_text_on_image (image, text, font, text_color, text_start_height) : draw = ImageDraw.Depict(image) image_width, image_height = image.size y_text = text_start_height lines = textwrap.wrap(text, width= forty ) for line in lines: line_width, line_height = font.getsize(line) draw.text( ( (image_width - line_width) / 2 , y_text) ,line, font=font, fill=text_color) y_text += line_height This is the side by side function in the same file, Wallpaper.py, where you will be putting text over the paradigm. Permit's understand the working of this function too :
- The
ImageDrawmodule is used to create 2D image objects. -
textwrap. wrap ( )wraps the single paragraph in text (a string), and then every line is at nearly 'width'(=40) characters long. Information technology returns a list of output lines. -
draw. text ( )Draws the string at the given position. The complete syntax and list of parameters it accepts are divers below:ImageDraw.Draw. text ( XY , text, make full, font)
Parameters:
- XY — Top left corner of the text.
- text — Text to be drawn.
- fill up — Colour to use for the text.
- font — An ImageFont example.
In the stop, hither's how your Wallpaper.py will look like:
from PIL import Prototype, ImageDraw, ImageFont import textwrap def get_wallpaper (quote) : # image_width image = Image.new( 'RGB' , ( 800 , 400 ) , color= ( 0 , 0 , 0 ) ) font = ImageFont.truetype( "Arial.ttf" , 40 ) text1 = quote text_color = ( 200 , 200 , 200 ) text_start_height = 100 draw_text_on_image(image, text1, font, text_color, text_start_height) image.save( 'created_image.png' ) def draw_text_on_image (image, text, font, text_color, text_start_height) : draw = ImageDraw.Describe(prototype) image_width, image_height = image.size y_text = text_start_height lines = textwrap.wrap(text, width= xl ) for line in lines: line_width, line_height = font.getsize(line) describe.text( ( (image_width - line_width) / 2 , y_text) ,line, font=font, fill=text_color) y_text += line_height Replying to the Mentions by Periodically Checking for Tweets
You take got the quote every bit well as an image that uses it. Now, the but thing left is to cheque for such tweets in which you are mentioned. Here, apart from only checking for mentions, yous will also look for a specific keyword or a hashtag in it.
If a detail keyword/hashtag is found in the tweet, you lot volition like and send a reply to that item tweet.
In this case, you tin can go with "#qod" (curt for "Quote Of the Day") as your keyword.
Coming dorsum within the tweet_reply.py file, here'south the function to reach this:
def respondToTweet (last_id) : mentions = api.mentions_timeline(last_id, tweet_mode= 'extended' ) if len (mentions) == 0 : return for mention in reversed (mentions) : new_id = mention. id if '#qod' in mention.full_text.lower( ) : try : tweet = get_quote( ) Wallpaper.get_wallpaper(tweet) media = api.media_upload( "created_image.png" ) api.create_favorite(mention. id ) api.update_status( '@' + mention.user.screen_name + " Here's your Quote" , mention. id , media_ids= [media.media_id] ) except : impress ( "Already replied to {}" . format (mention. id ) ) -
respondToTweet ( )function takes the last_id every bit its only parameter. This variable stores the last tweet to which you have responded and is used to only fetch mentions created after those already processed. So for the first fourth dimension when you call the office, you will ready its value as 0, and on the subsequent telephone call, you will keep updating this value. -
mentions_timeline ( )function in the Tweepy module is used to get the about recent tweets. The get-go parameter, i.e., the last_id, is used to fetch only the tweets newer than this specified ID. By default, it returns 20 most recent tweets. tweet_mode='extended' is used to get the string that contains the entire untruncated text of the Tweet. The default value is "compat" which returns text truncated to 140 characters only.
You and so loop through all of those tweets in reversed order, i.east., oldest tweet first, and for each tweet mentioning you, the tweet is liked using create_favorite ( ) , which but takes the tweet_id equally its parameter.
The respond to this tweet is sent using update_status ( ) which takes the Twitter handle for the original tweet author (You pass it using mention.user.screen_name), text content(if whatever), original tweet id on which you are replying, and finally the listing of media which in your case is the unmarried image you previously generated.
Saving Tweet ID to Avert Repetition
You need to brand sure to avert replying to the aforementioned tweet once more. For that, you will but shop the tweet Id to which you take last replied inside a text file tweet_ID.txt, and you will only check for the tweets that are posted after that. This will be automatically handled past the method mentions_timeline ( ) as tweet Ids are fourth dimension sortable.
And now, instead of passing the last_id yourself to the respondToTweet ( ) , you will pass the file containing this last id, and your function will fetch the Id from the file, and at the end, the file will go updated with the latest one.
Here's how the final version of the respondToTweet ( ) part will look like:
def respondToTweet ( file ) : last_id = get_last_tweet( file ) mentions = api.mentions_timeline(last_id, tweet_mode= 'extended' ) if len (mentions) == 0 : render for mention in reversed (mentions) : new_id = mention. id if '#qod' in mention.full_text.lower( ) : try : tweet = get_quote( ) Wallpaper.get_wallpaper(tweet) media = api.media_upload( "created_image.png" ) api.create_favorite(mention. id ) api.update_status( '@' + mention.user.screen_name + " Hither's your Quote" , mention. id , media_ids= [media.media_id] ) except : logger.info( "Already replied to {}" . format (mention. id ) ) put_last_tweet( file , new_id) You will observe that two new utility functions are also added here which are get_last_tweet ( ) and put_last_tweet ( ) .
get_last_tweet ( ) takes a file name every bit a parameter and will simply fetch the Id stored within this text file, whereas put_last_tweet ( ) along with the file name volition take the latest tweet_id and update the file with this latest Id.
Afterward putting everything together, hither's how your complete tweet_reply.py will look like:
import tweepy import json import requests import logging import Wallpaper import credentials consumer_key = credentials.API_key consumer_secret_key = credentials.API_secret_key access_token = credentials.access_token access_token_secret = credentials.access_token_secret auth = tweepy.OAuthHandler(consumer_key, consumer_secret_key) auth.set_access_token(access_token, access_token_secret) api = tweepy.API(auth) # For adding logs in application logger = logging.getLogger( ) logging.basicConfig(level=logging.INFO) logger.setLevel(logging.INFO) def get_quote ( ) : url = "https://api.quotable.io/random" try : response = requests.get(url) except : logger.info( "Error while calling API..." ) res = json.loads(response.text) print (res) return res[ 'content' ] + "-" + res[ 'author' ] def get_last_tweet ( file ) : f = open ( file , 'r' ) lastId = int (f.read( ) .strip( ) ) f.close( ) return lastId def put_last_tweet ( file , Id) : f = open ( file , 'due west' ) f.write( str (Id) ) f.shut( ) logger.info( "Updated the file with the latest tweet Id" ) render def respondToTweet ( file = 'tweet_ID.txt' ) : last_id = get_last_tweet( file ) mentions = api.mentions_timeline(last_id, tweet_mode= 'extended' ) if len (mentions) == 0 : render new_id = 0 logger.info( "someone mentioned me..." ) for mention in reversed (mentions) : logger.info( str (mention. id ) + '-' + mention.full_text) new_id = mention. id if '#qod' in mention.full_text.lower( ) : logger.info( "Responding back with QOD to -{}" . format (mention. id ) ) effort : tweet = get_quote( ) Wallpaper.get_wallpaper(tweet) media = api.media_upload( "created_image.png" ) logger.info( "liking and replying to tweet" ) api.create_favorite(mention. id ) api.update_status( '@' + mention.user.screen_name + " Here's your Quote" , mention. id , media_ids= [media.media_id] ) except : logger.info( "Already replied to {}" . format (mention. id ) ) put_last_tweet( file , new_id) if __name__== "__main__" : respondToTweet( ) Deploying Bot to the Server
The final step would be to deploy your code to a server. In this section, you'll larn how you can deploy a Python application to AWS Elastic Beanstalk.
With Rubberband Beanstalk, you can apace deploy and manage applications in the AWS Cloud without worrying almost the infrastructure that runs those applications. It reduces management complexity without restricting choice or control. Y'all simply upload your awarding, and Elastic Beanstalk automatically handles the details of capacity provisioning, load balancing, scaling, and application health monitoring.
Here's how y'all will go along:
- Create an AWS Elastic Beanstalk environment for a Python application
- Create a simple Flask Application for your Twitter bot
- Upload your Flask App on AWS Elastic Beanstalk
- Debug errors via logs
Creating Elastic Beanstalk surround
Once y'all are signed in to your AWS account, go to the search panel at the meridian, blazon & select "Elastic Beanstalk," and click create a new application on the top right.

It will inquire for your:
- Awarding proper noun
- Application tags(not mandatory)
- Platform
- Application code
For tags, you lot can add up to 50 tags for the resources of your AWS Elastic Beanstalk applications. Tags can assistance you categorize resource. If you're managing multiple AWS application resources, and so these tags tin come quite useful.
For the platform, select "Python" from the dropdown, and it volition fill the "platform branch" and "version" on its own.
For the awarding code, you will be uploading your code on elastic beanstalk later. So, for now, continue the "sample application" selected and hitting the create application button. It should take a few minutes before information technology gets ready.
Creating a Flask app
While AWS is creating an environment for you, in the meantime, create a new file called awarding.py and put the post-obit code in it:
from flask import Flask import tweet_reply import atexit from apscheduler.schedulers.background import BackgroundScheduler awarding = Flask(__name__) @awarding.road ( "/" ) def alphabetize ( ) : return "Follow @zeal_quote!" def chore ( ) : tweet_reply.respondToTweet( 'tweet_ID.txt' ) print ( "Success" ) scheduler = BackgroundScheduler( ) scheduler.add_job(func=task, trigger= "interval" , seconds= 60 ) scheduler.first( ) atexit.register( lambda : scheduler.shutdown( ) ) if __name__ == "__main__" : awarding.run(port= 5000 , debug= Truthful ) This is a uncomplicated flask app where you can create one function called task ( ) , which will run every minute using apscheduler, which will eventually call the main function of your tweet_reply.py file.
Please note that Elastic Beanstalk expects the name of your flask application object instance to be application. If yous volition apply whatever other name, and so Elastic Beanstalk would fail to load your application.
Upload and configure the application to AWS
To configure the AWS resources and your environment, yous tin can add Elastic Beanstalk configuration files (.ebextensions) to your web application'due south source code.
Configuration files are YAML formatted documents(JSON is also supported) with a .config file extension that is placed inside the folder named .ebextensions and deploy along with your application source lawmaking.
For this project, create a new binder .ebextensions in the source directory of your code and create a new file every bit python.config in that folder. Copy the lawmaking below code in it:
files: "/etc/httpd/conf.d/wsgi_custom.conf" : style: "000644" possessor: root grouping: root content: WSGIApplicationGroup % { GLOBAL } You volition likewise need to create a requirements.txt file, which will comprise all the external Python libraries that are required in your project for Elastic Beanstalk to configure the environment according to your application's need.
To create this file, simply run the following command: bash pip freeze > requirements.txt
At present y'all will need to zip all the files together to upload the flask app on Elastic Beanstalk. You should now have the following structure inside your project folder:
├── / .ebextensions │ └── app.config ├── application.py ├── tweet_reply.py ├── Wallpaper.py ├── requirements.txt ├── Arial.ttf └── tweet_ID.txt Select all these files and folders mentioned and Nix all of them together. Become back to your AWS application & click on Upload Code. 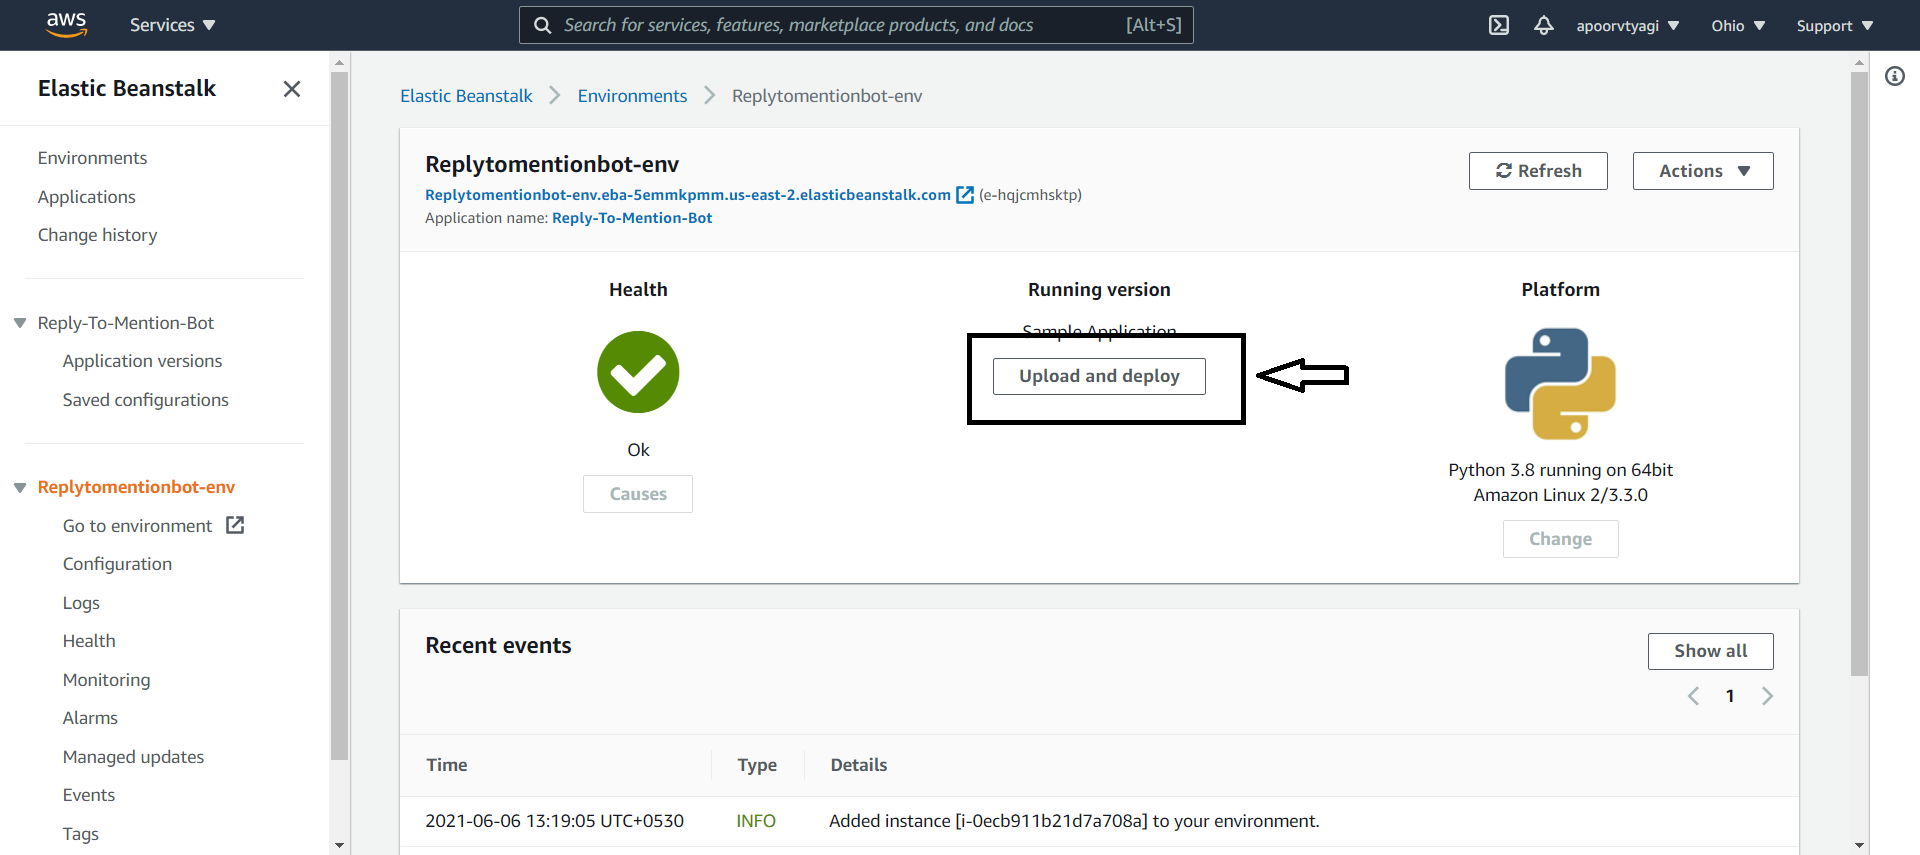
Cull your zip file and click deploy. Then wait until your application gets deployed and the health symbol turns dark-green. If you completed all these steps successfully, your website link should take you lot to a folio saying, "Follow @zeal_quote!"
How to view mistake logs in your environment
For debugging your application in instance any fault comes, just follow the below steps to view the logs for your app:
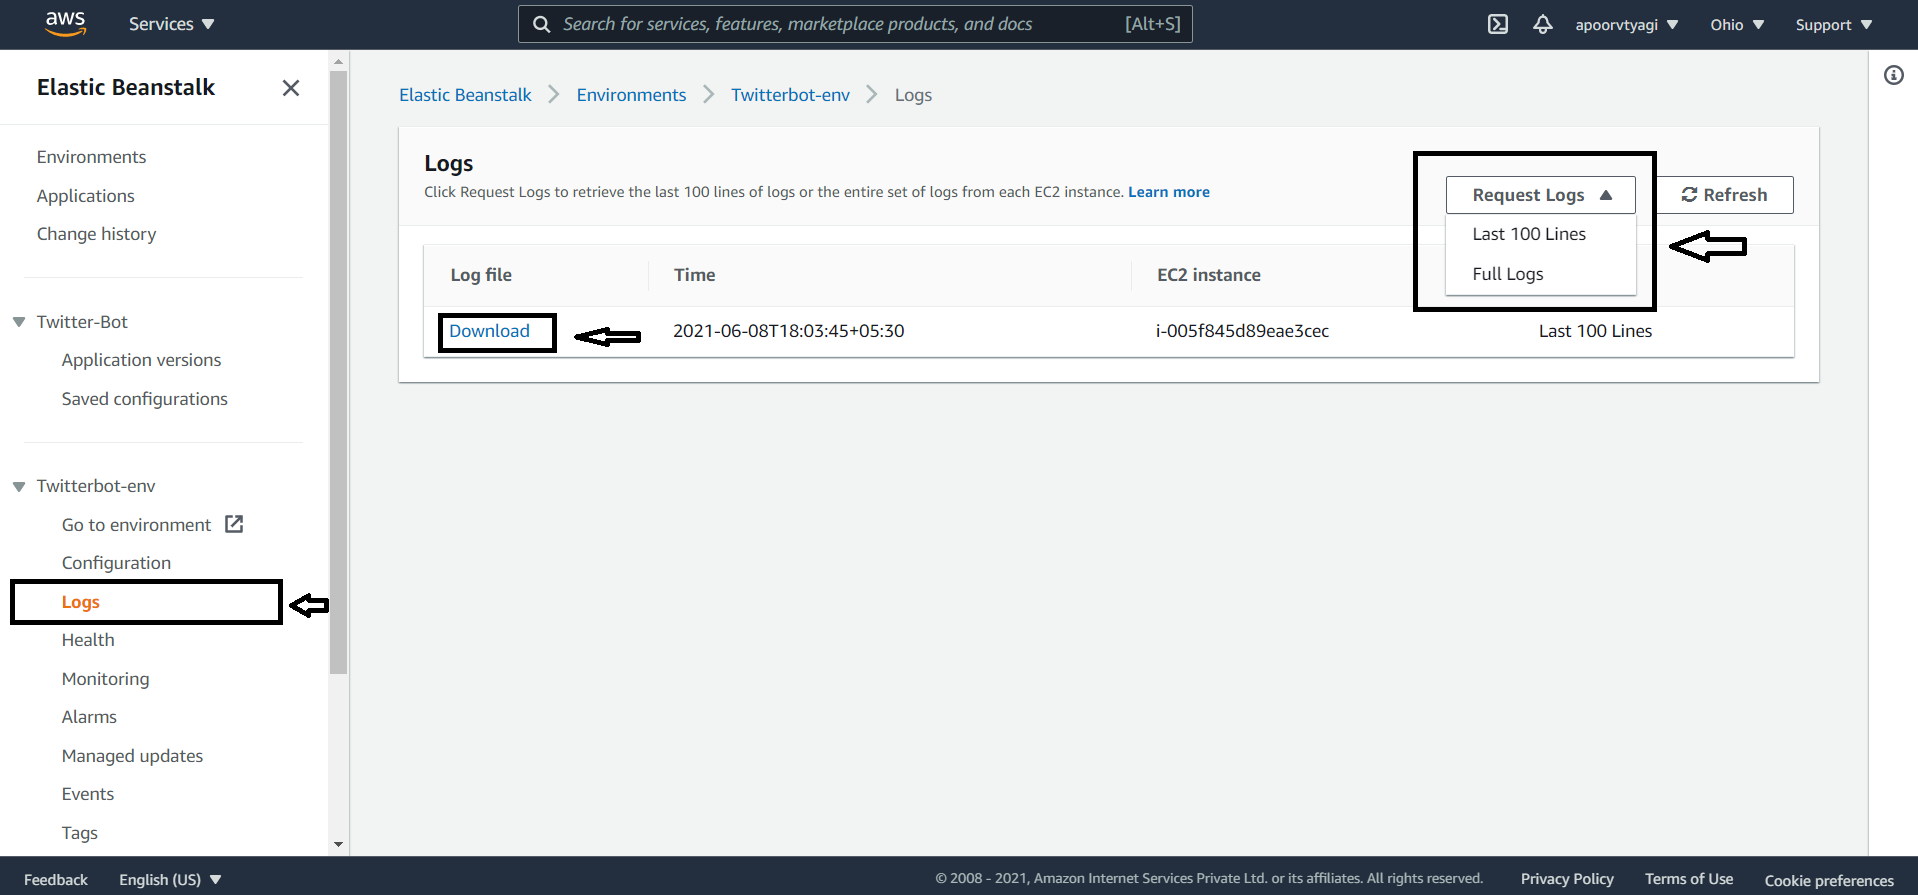
- In your Elastic Beanstalk dashboard, click on "Logs" from your environment section.
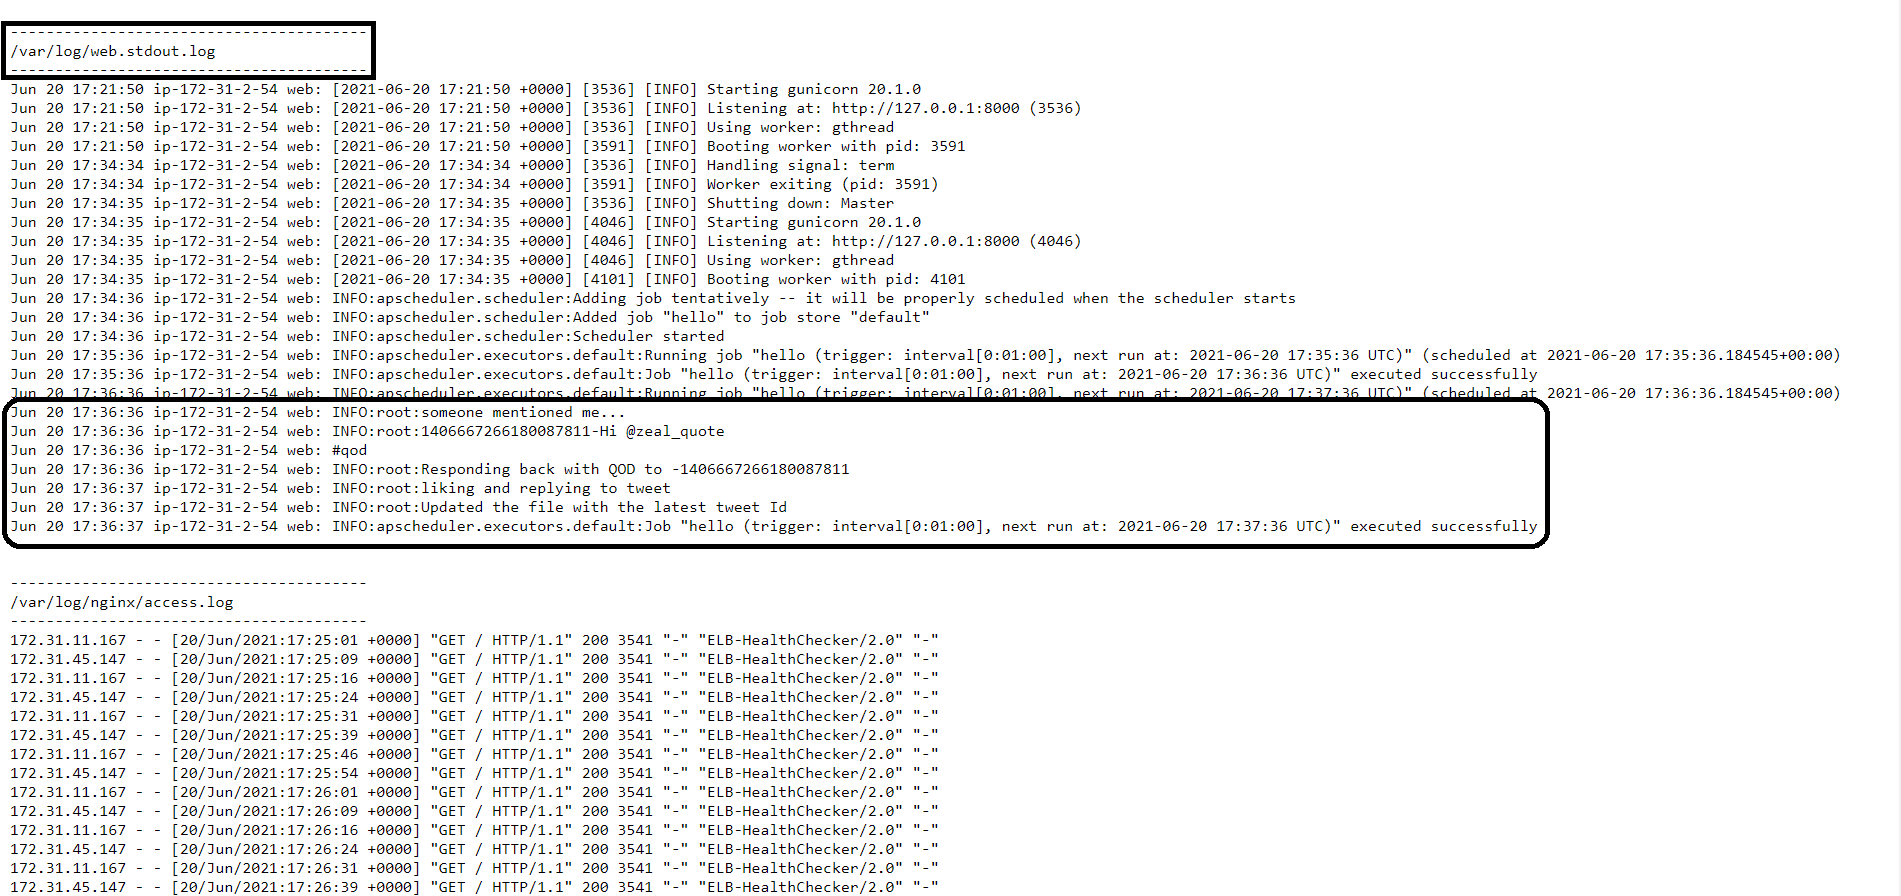
- It will take you to another page where you will become a dropdown after clicking "Request Logs". Select the "Last 100 Lines" for the nearly contempo errors, or yous as well take an option to download "total logs" in instance you're debugging the mistake that occurred a long time dorsum.
- Click "Download" and information technology will take y'all to a page where yous can view the last 100 lines of logs.
Wrapping Up
In this tutorial, you went through the consummate process of developing and deploying a Twitter bot in Python.
You lot also learned about Tweepy, how to sign upwards as a Twitter developer to use its API, use Tweepy to invoke the Twitter API, and configure an AWS Elastic Beanstalk environment to deploy your Python application.
All the source code that has been used hither is bachelor in this GitHub Repository. To examination the concluding working of the bot, you tin look for @zeal_quote on Twitter.
Do check out the complete Tweepy API documentation to make more complex bots that are meaningful to your use case.
Source: https://auth0.com/blog/how-to-make-a-twitter-bot-in-python-using-tweepy/
0 Response to "I Want My Bot to Tweet Out Any Time I Upload a Picture on Twitter"
Post a Comment